

This guide is intended to be a living version of all my personal Legend of Mushroom knowledge from throughout the game. I will regularly be writing articles about different areas of the game which I have encountered which will be updated here. I play primarily as a Wind Crossbow, as at the moment I find it is the best class for covering both PVE and PVP gameplay at the moment.
Most of this guide will be catered to Wind Crossbow gameplay, however, a lot of it will cover the game in general so might be helpful to have a skim through if you play any other class.
If you have any questions notice that something is wrong or missing, or want me to cover certain areas of the game please reach out on Discord: _Newms_ or comment on any of the guides I post and I’ll try my best to get back to you in a timely manner.
I had previously written a guide for the early game which you can find here which should be applicable on servers which are relatively new. Otherwise, scroll down and enjoy the content!
New Item Review
Love Event

Artifact – Skyward Blade: PVE 1/5 PVP 1/5
Effect: Every 10 Basic Attacks, Combos and Counters, deal 150% basic attack damage.
This artifact is awful. In the game any effect which is a flat damage weapon/mount/wing is not going to scale as well as raw stat boosts / skill bonus effects. This does a tiny amount of flat damage every 10 hits / combos / counters. An easy skip for all classes.

Wings – Myriad Spikes: PVE 1/5 PVP 1/5
Effect: Deal bleed damage 5 times every 11s equal to 200% basic attack damage. Also, has a 50% of dealing 1.5% HP.
These wings suffer for the same reason as the artifact. Flat damage is useless. Don’t get tricked by the 50% chance of 1.5% HP. That works out at (5*0.5*1.5) = ~3.5% of the targets health every 11s. Absolutely tiny. 1000% basic attack damage every 11s is also extremely minimal for all classes. Easy skip.
Pepe Event
Pepe event introduced a new mount, wings and artifact.
Mount – PVP: 1/5 PVE: 1/5
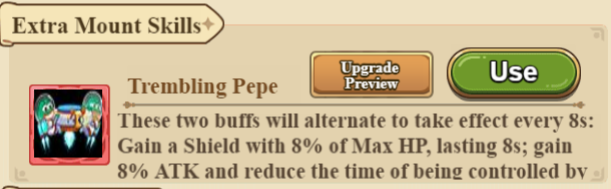
This mount is fairly useless in PVE compared to something like Pyrebreaker. The attack and shield won’t help much. In PVP, although this gives a nice 30% CC reduction like the Blue Ox, the cycle is in the wrong order. You want CC reduction at the start when your opponent uses all their skills. So you’ll be unlikely to see any benefit.
Artifact – PVP: 2/5 PVE: 1/5
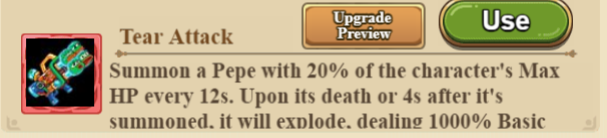
When this first launched, it looked like a nice way to get a second clone. Unfortunately, this Pepe doesn’t attack at all apart from the explosion at the end which does very minimal damage. It is basically a 20% shield for blocking non-AOE damage which isn’t awful, but there’s much better artifacts for PVP and PVE.
Wings – PVP: 4/5 PVE: 2/5
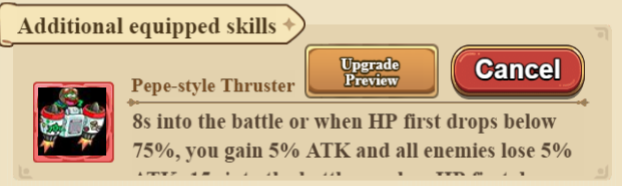
Great item for PVP, the other wings in the game at the moment scale up with attacks, so with short PVP fights you don’t get the full value of the wings quick enough. This will give you a 10% attack benefit over your opponent (75% of the fight), 10% damage resist (50% of the fight) and a 16% relative HP boost over your opponent. Very nice! In PVE this is less useful.
General Information
Diminishing Returns
This is a concept that will help you understand how to best optimise your stats in the game. While this applies to all classes, Wind Crossbowers can especially make use of this to optimise damage in all parts of the game.
The basics
To summarise diminishing returns: “The more you have of something, the less each increase benefits you”.
A good example of this is in PVP Prayer Statue where we use attack prayers as an example.
Using in the context of Wind Crossbow
Combo damage quadruple dips in your stats. Under the right situations, the following stats multiply together:
Attack, Basic Attack Damage, Combo Damage, Crit Damage.
- Basic attacks multiply with your attack to deal increased damage.
- Combo attacks shoot additional basic attacks which multiply by combo damage.
- Critical hits multiply your crit damage with your overall combo damage.
So you can hopefully see that a combo attack that critically hits will use all of these stats together, multiplicatively, to do damage.
Let’s say you have 4000% to distribute over these 4 attributes to increase them by. What’s the best distribution?
If we put it all in Combo damage, then our critical combos will do:
100% x 100% x 4000% x 100% = 4000% damage (40x damage).
If we spread it evenly, then our critical combos will do:
1000% x 1000% x 1000% x 1000% = 1,000,000% damage (10,000x damage).
In short, don’t put all your eggs in one basket!
The exception to this is damage reduction and evasion. You want to stack these to the moon. These stats have what I’d call “Inverse diminishing returns”.
Consider the extreme case that you have 60% damage reduction. An attack that would hit you for 100, is hitting you for 40. If you gain an extra 20% damage reduction, you are now taking 80% reduced damage and the attack now hits you for 20. That 20% damage reduction has actually reduced the damage you’re taking by 50%!!!
Helping yourself get better
While I can write as much as possible in a guide about what is best for archers, a lot will depend on your account. What you have available to you in terms of skills, pals, mounts, artifacts and everything else will dictate what you can do to get better. Watching your own battles in all parts of the game can be very useful. Here are some things to look out for:
Hydrosprite
This little dude can be amazing for all classes in the right situation, in other situations he can be a complete waste of a pal slot.
Effect: Increase Active Skill Energy Regeneration by X%
In all fights in the game, all of your active skills will be used when the fight starts. In some fights, you might kill the enemy / die before you can use these abilities again.
In the fights where you’re using hydrosprite, if the fight doesn’t last long enough to use your abilities a second time then hydrosprite is a wasted pick. If this is regularly happening, consider removing it from your lineup.

Natures Renewal
This ability can also be a trap if you’re not watching your fights.
Effect: Deal some damage, restore 30% of your health over 5 seconds.
Similar to the hydrosprite situation, your character will autocast all of their abilities at the start of the fight. The problem with this is, at the start of the fight your character will have 100% HP, any healing above that is wasted. So the first cast of natures renewal will have a very limited effect. Especially so if you’re using Blitz Assault which already provides an immunity.
It also has a long cooldown so is unlikely to be used a second time during the fight.


Dazzled/Disarm
These are two absolutely amazing abilities. When used in combination of the Time Statue relic, Dazzled will stun for 2.25s, and Disarm will prevent your opponent from attacking for 4.5s.
The problem arises when you use the two of these together. Again, you’ll use all your abilities at the start of a fight. So in boss fights (which only use basic attacks), the stun will overlap with the disarm effect.
What’s even worse, if you’re using hydrosprite, the second use of Dazzled will also fully overlap with the Disarm effect! If you’re not running hydrosprite, 1.5 seconds of the stun effect will be wasted on the second cast.
It is worth noting that stuns have a bonus compared to disarm: enemies cannot evade, cannot cast abilities (PVP mainly) and cannot counterattack. Disarm just prevents auto attacks.
Wind CrossBow PVP
Battle Plans
As your account progresses, and you gain more pets, skills, gear, mounts, etc. one of the most important things you can do is specify different builds for different areas of the game. First and foremost is creating a PVE (player vs environment) and PVP (player vs player) build.

You can do this by selecting the gear icon to the right of your lamp:
Here you can create and rename different builds which can be applied to
different scenarios: Arena & Cross Server PVP / Raid Grumpy Bighead (family fish boss) / Manor battle (Parking wars & Farm)
Manor battles are all PVP fights so just use your PVP build for both Arena and Manor battles.
!!!! Dont forget to set your battle plan in the family brawl as well (top left of the screen) !!!!

PVP Skills
The correct abilities to use will depend on what level your account is and what you have unlocked. To best choose abilities see the graphic below for Wind Crossbowers:
To help understand why they’re good and what to pick for your situation:
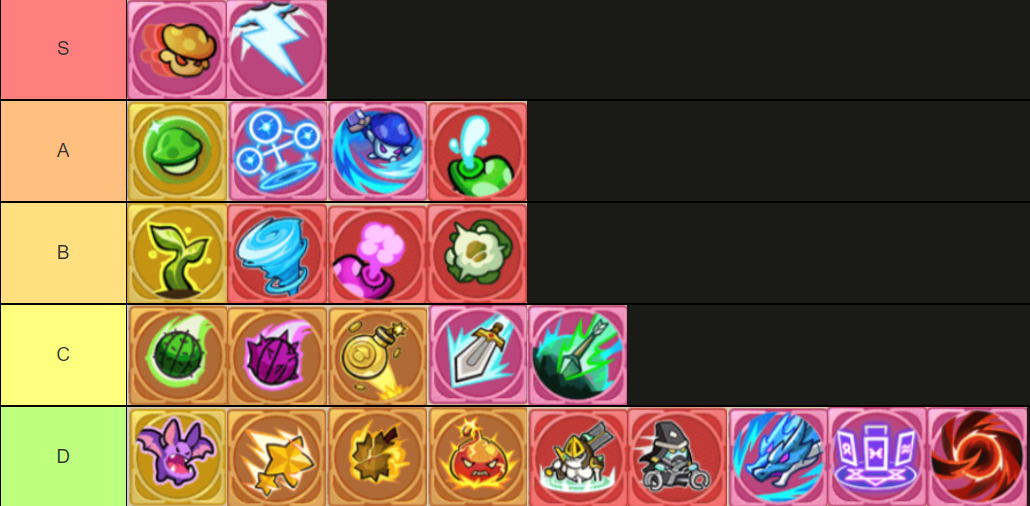
Clone Strike
Easily the best ability in the game right now. This effectively gives you a 30% shield since the clone has 30% of your max health AND increases your damage by 200%+. If your opponent cannot kill it before their blitz assault immunity / disarm debuff fades, then they’ll most likely lose. This is an auto-include if you have it.
Blitz Assault
I put this in S-tier because it completely counters mages’ openers. All players will auto-cast all of their abilities instantly when the fight starts. Since mages’ damage is all from their abilities, you effectively stop them from doing any damage until their abilities come back up. It’s also great vs archers and warriors for the same reason.
Shroomshield
I put this in A tier since it’s one of the first good PVP abilities you’ll get early on. It has a low cooldown and the 20% shield doesn’t break if you combine it with the immunity from Blitz Assault. It also has a nice low cooldown if you can get your abilities to come back around before dying.
Worldly Snare & Hundred Slashes
Two great damage abilities. It is worth noting however that the meta at the moment is running Disarm, so you will be unlikely to get much bonus from the buff from these abilities.
Disarm
Great ability that will counter enemy archers for 3 seconds (4.5 seconds if you use the relic). Do note, that warriors will be able to counterstrike you still even though they are disarmed.
Natures Renewal
A 30% heal is great, except for one problem. It auto-casts at the start of the fight. So if you are running Blitz Assault, you’re not going to be taking any damage and so the heal is useless. Due to the long 25-second cooldown, it is quite unlikely that you will get it back up again before the fight ends. A great ability if you don’t have Blitz Assault though.
Wild Gust
Average ability, the increased attack is nice, but as a wind archer you’re likely going to be disarmed for its duration.
Dazzle
Normally a good ability, but due to you using all abilities at the same time, it will overlap with the disarm effect and be useless on your first cast.
Smoke Bomb
Decent ability here too, but disarm and blitz assault will nullify the first time this debuff goes out.
PVP Pals
I have included the max tier versions of each type of pal. If you don’t have the one shown, then there are other lower rarity types which have the same effect but are weaker.
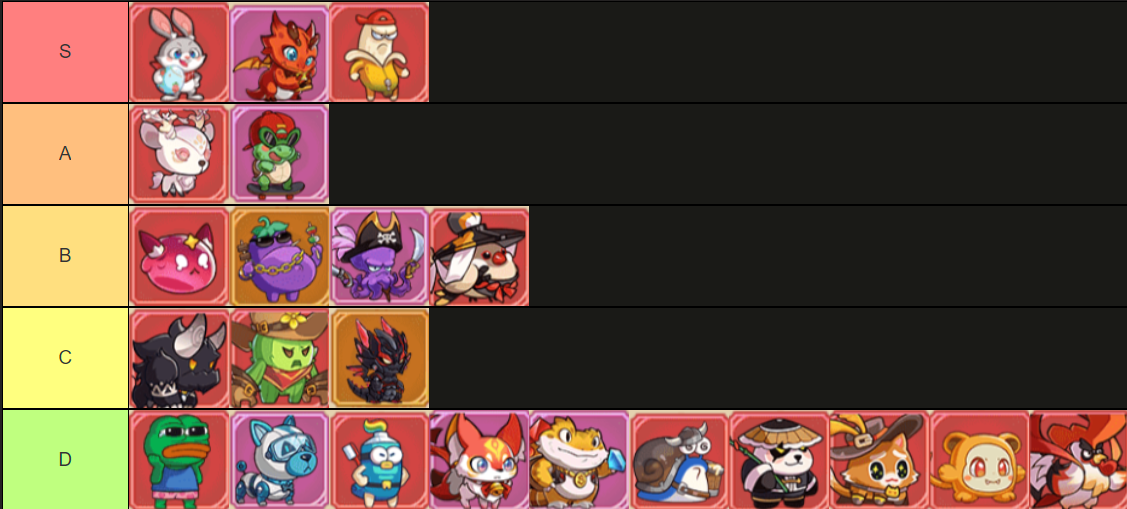
Benny
+5% crit rate? Amazing, 30% Launch? Amazing. This guy will launch at least 4 times or so throughout a PVP fight. It will effectively stun your opponent for 0.5 seconds each time
Treasure Dragon
Don’t just auto-include this guy if your crit rate is low. Treasure dragon is an amazing pet because every other source of increased crit damage is global: Prayers, Souls, Seals. What this means is, that gaining an extra 50% base crit damage is massive because your base crit damage goes from 200% to 250%. Once you multiply that by your global crit multipliers, it’ll be a massive change.
Righteous Banana
Combo chance? Amazing, Combo Damage? Amazing.
Deer + Turtle
Both of these are good picks. Turtle will give you effectively 30% extra health which is nice, Deer gives you effectively 1/(1-0.15) = 17% extra health. The benefit of the deer is that your clone strike gets the damage reduction too, and damage reduction is effectively inverse diminishing returns so stacking this with the Blue Ox mount will give you (1/(1-0.25)) = 33.3% extra health. Both get an A tier.
Hydrosprite
This one can be hit and miss depending on your character. If the battle is ending before you get to use your abilities a second time, then it has effectively done nothing. However, if your battle lasts long enough this is definitely an S-tier pal.
Eggplant
Crit chance is nice. Worth including if you have high crit damage.
Octopus
This guy looks really good on paper. I’ve never noticed enough benefits in PVE for him to be good in PVP. Definitely try him out yourself and see.
Bird
Attack speed is great. Some mounts/artifacts stack up the more attacks you do, if you’re running one of those, try to include bird.
PVP Prayer Statue
What prayers you should run depends on your account progress.
Diminishing Returns
It is important to know about the concept of diminishing returns.
Let’s say you have 100 attack for simplicity’s sake.
If you have 0% bonus global attack, and roll a statue bonus with +10% global attack, your attack will go from 100 to 110. A 10% increase in attack.
If you have 200% bonus global attack from other sources, then roll a 10% bonus global attack on your statue, your attack goes from 100*(1+200%) = 300 to: 100*(1+210%) = 310
Going from 300 to 310 attack is only roughly a 3% bonus in attack.
What this means is for various areas of the game, you want to optimise stats based on where you can get the bonuses. The more bonuses you already have, the less each bonus will make you stronger.
Main stats
For wind crossbow, your main stat priority is Combo damage, Crit damage, Attack, since most of our damage comes from combo’s.
For these stats, the statue gives global bonuses to each. With diminishing returns in mind, its worth considering the places you might get the same global bonuses:
Combo: Statue, Pink souls, Artifact enchant
Attack: Mount, Statue, Artifact bonus, Pink attack soul, Awakened Seal, Costume
Crit Damage: Red/Pink Soul, Awaken Seal
What prayers to choose
>50% global attack bonus AND >200% global crit damage bonus: 5x Combo
<50% global attack bonus AND >200% global crit damage bonus: 4x Combo 1x ATTK
<50% global attack bonus AND <200% global crit damage bonus: 3x Combo 1x ATTK 1x CRIT
You can view your global stats by doing the following:
View any player’s profile that you can find in chat:

Click the compare button
Click the “i” next to each stat to see the breakdown

PVP Relics
Relics for PvP are fairly straightforward.

For Mask, you want to pick one of either crit or combo chance. Which one you choose will depend on your gear. From my understanding, since combo attacks can crit, you actually want a fairly balanced chance between both crit and combo (with slightly more combo chance). For that reason, I run the crit one since you get a decent boost to combo chance from your class.


For the Fossil relic, it doesn’t matter too much what you pick. Either go with Kite, which is a solid choice, or dragonweave circlet if you have dragon or turtle pals in your PVP team.
For Treasure just pick whatever applies to what pals you are using in your PVP team.

For Book, the only choice is Stonewrit Tome


For Statue you want to use Time Statue as long as you have one of the relevant skills in your PVP skills (Disarm, Smoke bomb or Dazzle). Otherwise, Cage statue is a great alternative for players in the early game.

For Necklace, the only choice here is Storm Necklace to provide a massive buff to your clone’s attacks.
PVP Mounts
For those who spend enough to unlock mounts, or save enough to earn mounts through the Rush shop, the right mount can provide a massive benefit to your PVP gameplay.
The first thing to note about mounts is that they have an active and passive effect. For example with Pyrebreaker:

Extra mount Skills is only applied when you have the mount equipped. You can therefore only have one mount skill active at any time in the game.
Mount Effects are always active, even if the mount isn’t being used. The more mounts you have the stronger your character will get!
What this means is, for the rush shop for those doing well in events, is that you’ll want to collect one of each before upgrading mounts.
What mount to use?
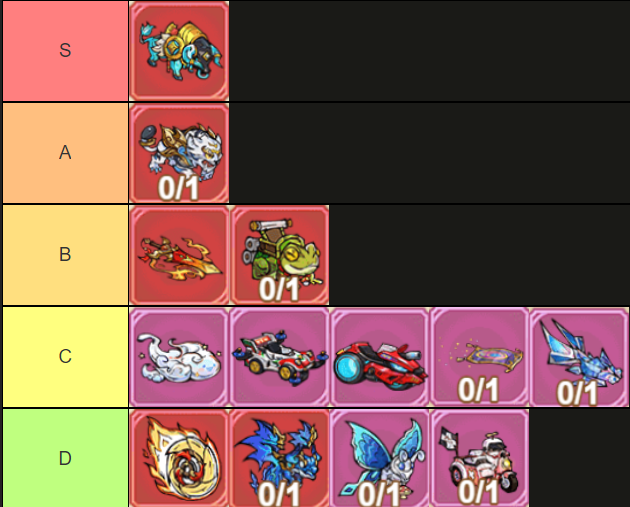
Blue Ox
30% reduction in CC is amazing for PVP. Those extra few seconds you’ll get to start attacking before your opponent during a disarm is amazing. Extremely helpful as well against mages which have a high stun rate. The 10% damage reduction is also fantastic.
White Tiger
The stat boost/reduction is amazing for the tiger.
Pyrebreaker
A great mount you can get from the rush shop. It will have a great benefit for those who have high enough crit rate/damage AND if your fights go on for long enough.
Round Pepe
This frog seems quite nice. A 1s stun every 10s AND a 5s 15% attack boost is very nice. Possibly A tier but haven’t tested yet.
The remaining mounts provide very little benefit during PVP. Since all our damage comes from combos, anything that says “Deal X% damage” will be very minimal. You can get your combo damage up to 10000% easily enough with statues, souls, etc. So if a mount is doing 1000% damage every few seconds, this will literally be 1/10th of a single combo attack. Raw stat boosts and debuffs will always be better than a mount which occasionally does some damage.
PVP Artifacts
We are currently limited on the artifacts you can choose from. They also don’t seem to be obtainable after the event they were available for. This can hopefully make the choice fairly easy.
Eye of the Raven
Amazing for getting that second clone strike if you’re lucky. If you have this I would take a look at all of your skills and ensure that they are something that you’d want to cast a second time. For this reason, I run: Clone Strike, Disarm, Blitz Assault, Wordly Snare, and Smoke Bomb (assuming those last two stack when cast multiple times).
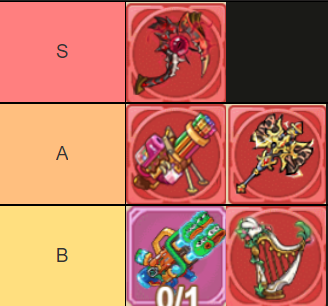
Gatling Gun / Warlord’s Hammer
Both of these are a 30% boost to your combo damage which is really nice. The Gatling gun has more varience, but overall will be the same as the warlords hammer. If you have both, and not eye of the raven, then use the Hammer. Just for the niche situation where your opponent has a clone alive, then you will do extra damage to both them and their clone.
Pepe Gun
The mini clone doesn’t attack but does provide a 20% effective shield while he takes damage. The damage he does is negligible.
Harp
The damage this does is negligible. The confusion will overlap with your disarm ability so will effectively do nothing until the second time it casts. At which point, you’re probably dead.
Soul System
Quick Summary
Each day try to get as high as possible in the soul trial. This rewards you with crystals which you can use to summon random souls. These souls provide stat boosts to your character. There are 16 different kinds of souls which target different stats, they come in 6 different rarities (green to pink). These are split into 8 Soul 1s and 8 Soul 2s.
Once you obtain a specific type of red soul 1 and red 2, you can merge them into pink souls which are much stronger. You can equip 8 souls in total, and all must be a different kind. So you can’t stack multiple Combo Damage souls as an archer.
Souls can be levelled up by soul essence which you can obtain through recycling unused souls. Recycling a soul you have already levelled will return all the essence to you. Generally, try saving this for the event to upgrade souls, which comes around every 4 weeks and lasts a week.
Archer priority: Get gold soul 1s from Soul Prayer → Get Red Soul 1s for Combo, Crit, Attack, HP, Defence (in that order) from Soul Prayer & Red Soul 1 Selections → Fuse with Red Soul 2s for pink: Combo = Attack >> Defence > HP (in that order). Combo pink will only help with PVE. Attack is useful everywhere. Pink Crit Dmg soul isn’t useful for archers since it provides the same crit damage as the red one, just adding skill crit damage (which is useless)
Mage priority: Get gold soul 1s from Soul Prayer → Get Red Soul 1s for Attack, HP, Defence (in that order) from Soul Prayer & Red Soul 1 Selections → Fuse with Red Soul 2s for pink: Attack >> Crit Dmg = Basic Attack Dmg > Defence > HP (in that order). Unfortunately for mage their stats are spread over quite a few pink souls. The Crit Dmg and Basic Attack Dmg pink souls are also providing Skill Crit Dmg and Skill Dmg which is why they are so important.
Warrior priority: Get gold soul 1s from Soul Prayer → Get Red Soul 1s for Counter, Crit, Attack, HP, Defence (in that order) from Soul Prayer & Red Soul 1 Selections → Fuse with Red Soul 2s for pink: Attack >> Defence > HP (in that order). Pink soul for Counterstrike is not useful, since it provides the same amount of counterstrike damage per level, just with added Pal Dmg, which is useless.
What is it?
The soul system can provide an immense amount of power to your character, in the form of raw stat boosts. There are 6 different rarities of souls: Green, Blue, Purple, Gold, Red and Pink in order of increasing power. There are 16 total different types of souls, affecting 16 different stats of your character.
A red soul provides the most amount of stats, a pink soul is a combination of 2 specific red souls, which for some, provides a slightly different stat boost.To produce a pink soul, you must merge two different types of red souls, which are aptly called: Red Soul 1 and Red Soul 2.
How do I get Red Souls?
You can acquire red souls through a couple of different methods:
Soul Prayer – this is where you can summon all rarities of souls using soul crystals which you acquire through various activities in the game. These will all be type 1. The specific stat of each prayer is randomly chosen for you.

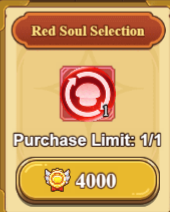
Family Brawl Shop – You can buy a Red Soul 1 Selection from the family brawl shop for 10,000 brawl coins. This is amazing as it lets you pick which red soul 1 you want from the 8 different types of souls within the Red Soul 1 pool.

Event Shop – Here you can buy Red Soul 1 Selection if you spinner enough times on special event spinners.
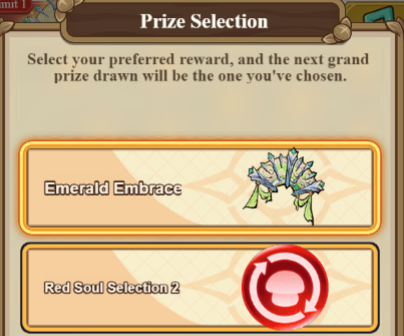
Lucky Spinner Events – You can acquire Red Soul 2 through the Lucky Event Spinner. At the moment in the game you can select between two different rewards, either a mount/back accessory or a red soul 2.
Cross Server PVP – Here you can buy Red Soul 2 Selections in the cross server shop. Please make sure you have 6/6 awakening crystals before buying this!
What are the priorities?
The first priority should be getting gold of each soul 1s, you can get these using the soul crystals that you acquire to summon various rarities of souls. Once you have gold in every soul slot, you can recycle every other soul you get through prayers.
Next priority is getting Red Soul 1s, these are easier to obtain than Red Soul 2s. As a wind archer you priority is Combo Damage, Crit Damage, Attack, Hp, Defence, Basic Attack Damage. The remaining 3 are relatively useless for your class.
Once you start getting Red Soul 2s, which for Free to Play players, this will be once you have already bought all 6 awakening crystals from the PVP shop, your priority for upgrading to pink souls is: Combo = Attack >> Defence > HP.
Note the combo pink soul doesn’t help at all in PVP, but adds a load of boss damage which is very nice for PVE. Attack, Defence and HP are extremely nice because the pink versions of these change from increasing your flat Attack% (for example) to Global Attack%, which is much more beneficial.
The remaining 4 pink souls are so minimally useful to wind archers that it is not worth obtaining them, since both the Red Soul 2 part of them is useless and the Red Soul 1 part doesn’t change to higher scaling like it does for Attack / Def / HP.
Rune Stones
What are they?
Runestones are usable in the artifact’s enchantment tab and can provide amazing buffs for both PVE and PVP.
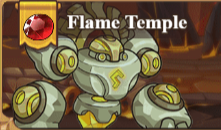
You can collect runestones from the Flame Temple dungeon. This dungeon goes up to level 20 and provides higher rarity rewards the higher level you clear. Once you clear level 20, just hit the sweep button to save yourself some time clearing it again.
Runestones have 6 different slots with different main stats available depending on the slot. Each runestone has 1 major affix, which increases in power every level. It also has up to 4 minor affixes, which increase in rarity (or add a new one if there are less than 4) every 4 levels.
Above level 5, recycling a runestone will start giving less xp than you put in, so be careful levelling them too high if you think you might swap them out at some point.
The maximum rarity of runestone is pink. Higher rarity runestones come with more minor affixes and higher scaling of the main affix per level. So aim for pink! Pink runestones have a 1% chance to drop. You can get up to 20 runestones per try in the Flame Temple.
You can also make sets with Runestones, there are 3 different set types: +5%/+10% Global Combo Damage, +5%/+10% Global Counter Damage, +5%/+10% Global Basic Attack Damage.
Overall, these bonuses are quite negligible, so aim for better runestones over set bonuses!
Available Main Affixes and What to Pick
Slot 1 (Top Left):
Main stat: HP
Slot 2 (Left):
Main stat: Attack
Slot 3 (Bottom Left):
Main stat: Defence
Slot 4 (Top Right):
Main stat: Combo Damage, Counter Damage, Skill Damage, Basic Attack Damage, Pal Damage.
(Archers pick Combo, Mages pick Skill Damage, Warriors pick Counter)
Slot 5 (Right):
Main stat: Combo Damage Res, Counter Damage Res, Basic Attack Damage Res, Pal Damage Res
Since Warriors are the strongest in PVP, I recommend picking a runestone with Counter Damage Res.
Slot 6 (Bottom Right):
Main stat: Crit Damage Bonus, Crit Res Bonus, Skill Damage Res, Boss Damage, Boss Damage Res
Crit Damage Bonus is best here for archers and warriors. Mages pick whatever you want.
SubAffixes and What to Pick
There’s a whole load of sub affixes, I’ll try to list them in order of priority:
Tier 1: Counter Damage Res, Launch/Airborne (for archer), Combo Damage Res, Evasion
Tier 2: Skill Damage Res, Basic Attack Damage Res, Boss Damage Res, Ignore Launch/Airborne, Global Combo (archer), Global Counter (warrior), Skill Crit Damage (mage)
Tier 3: Global Basic Attack Damage, Boss Damage, Ignore Evasion, Stun (Tier 1 for mages), Ignore Stun
Tier 4: Pal Damage, Pal Damage Res, Healing Amount